- Seite 2 und 3: Bedienungsanleitung ATH-W W142 Seri
- Seite 4 und 5: 1.0 EINLEITUNG 1.1 Allgemeine Infor
- Seite 6 und 7: 3 4 1 2 9 8 6 10 7 5 1) Anzeige Unw
- Seite 8 und 9: 1.3. Bedienung 1.3.1. Selbsttest Na
- Seite 10 und 11: 1.3.4. Eingabe der Reifengrößen a
- Seite 12 und 13: 1.3.5. Wuchtvorgang starten Wuchtvo
- Seite 14 und 15: Danach wird in der Anzeige die UNWU
- Seite 16 und 17: 1.4. Technische Daten Maximales Rad
- Seite 18 und 19: 2.0 INSTALLATION Die Maschine muss
- Seite 20 und 21: LED Monitor mit Halterung Auffahrra
- Seite 22 und 23: Zeichnung ® Urheberrecht ATH-Heinl
- Seite 24 und 25: 2.8 Hydraulischer Anschluss Bevor d
- Seite 26 und 27: Entfernen Sie die Befestigungsschra
- Seite 28 und 29: 2.9.6 Montage der Auffahrrampe Lös
- Seite 30 und 31: Ein- bzw. Ausschalten der Laser-Fun
- Seite 32 und 33: Im Display erscheint die Anzeige [C
- Seite 34 und 35: 2.9.12 Service-Kalibrierung der Mes
- Seite 36 und 37: 3.0 BETRIEB 3.1 Betriebsanweisung F
- Seite 38 und 39: 4.0 WARTUNG Um einen sicheren Betri
- Seite 40 und 41: 4.3 Hinweise Die Maschine ist, unab
- Seite 42 und 43: Symptome Ursache Lösung Unterschie
- Seite 44 und 45: Einstellung der Antriebsriemenspann
- Seite 46 und 47: 6.0 ANHANG 6.1 Pneumatik-Schaltplan
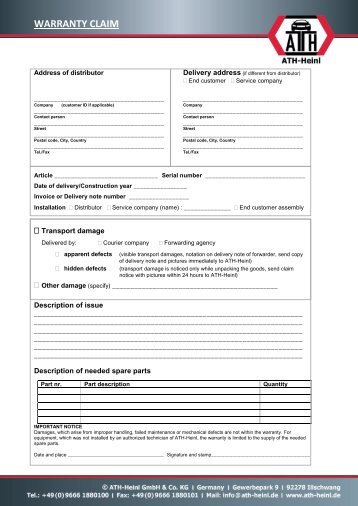
- Seite 48 und 49: 7.1 Umfang der Produktgarantie •
- Seite 50 und 51: 8.1 Aufstellungs- und Übergabeprot
- Seite 52 und 53:
8.3 Sichtprüfung (Befugte Sachkund
- Seite 54 und 55:
Sichtprüfung (Befugte Sachkundige
- Seite 56 und 57:
Sichtprüfung (Befugte Sachkundige
- Seite 58 und 59:
9.0 NOTIZEN ® Urheberrecht ATH-Hei
- Seite 60 und 61:
® Urheberrecht ATH-Heinl GmbH & CO
- Seite 62 und 63:
Operating Instructions ATH-W W142 S
- Seite 64 und 65:
1.0 INTRODUCTION 1.1 General Inform
- Seite 66 und 67:
3 4 1 2 9 8 6 10 7 5 1) Display INT
- Seite 68 und 69:
1.3 Operation 1.3.1 Self test After
- Seite 70 und 71:
1.3.4. Entry of the tyre sizes a) B
- Seite 72 und 73:
1.3.5 Starting the balancing proces
- Seite 74 und 75:
The display will then show the INTE
- Seite 76 und 77:
1.4 Technical Data Maximum wheel we
- Seite 78 und 79:
2.0 INSTALLATION The machine must b
- Seite 80 und 81:
LED monitor with holder Access ramp
- Seite 82 und 83:
Drawing ® Copyright ATH-Heinl GmbH
- Seite 84 und 85:
2.8 Hydraulic Connection Before the
- Seite 86 und 87:
Remove the fixing screws from the h
- Seite 88 und 89:
2.9.6. Assembling the access ramp R
- Seite 90 und 91:
Turn the laser function on/off usin
- Seite 92 und 93:
The display shows [CAL] - [300] Pos
- Seite 94 und 95:
2.9.12. Service calibration of the
- Seite 96 und 97:
3.0 OPERATION 3.1 Operating Instruc
- Seite 98 und 99:
4.0 MAINTENANCE The user must maint
- Seite 100 und 101:
4.3 Notes Regardless of the level o
- Seite 102 und 103:
Symptoms Cause Solution Different b
- Seite 104 und 105:
Setting the drive belt tension 1. C
- Seite 106 und 107:
6.0 APPENDIX 6.1 Pneumatic circuit
- Seite 108 und 109:
7.1 Scope of the Product Warranty
- Seite 110 und 111:
8.1 Installation and Handover Log S
- Seite 112 und 113:
8.3 Visual inspection (authorised e
- Seite 114 und 115:
Visual inspection (authorised exper
- Seite 116 und 117:
Visual inspection (authorised exper
- Seite 118 und 119:
9.0 NOTES ® Copyright ATH-Heinl Gm
- Seite 120 und 121:
® Copyright ATH-Heinl GmbH & Co. K
- Seite 122 und 123:
Manuel d‘Utilisation ATH-W W142 n
- Seite 124 und 125:
1.0 INTRODUCTION 1.1 Informations g
- Seite 126 und 127:
3 4 1 2 9 8 6 10 7 5 1) Indicateur
- Seite 128 und 129:
1.3 Utilisation 1.3.1 Autotest Quan
- Seite 130 und 131:
1.3.4. Saisie des tailles de pneus
- Seite 132 und 133:
1.3.5 Lancer la procédure d'équil
- Seite 134 und 135:
L'indicateur affiche ensuite le BAL
- Seite 136 und 137:
1.4 Caractéristiques techniques Po
- Seite 138 und 139:
2.0 INSTALLATION La machine doit ê
- Seite 140 und 141:
Moniteur LED avec support Rampe d'a
- Seite 142 und 143:
Croquis ® Droit d'auteur ATH-Heinl
- Seite 144 und 145:
2.8 Raccordement hydraulique Avant
- Seite 146 und 147:
Retirez les vis de fixation du châ
- Seite 148 und 149:
2.9.5. Montage du moniteur Fixez le
- Seite 150 und 151:
2.9.8. Réglage du mode d'applicati
- Seite 152 und 153:
2.9.10 Calibrage de service du cali
- Seite 154 und 155:
Appuyez de nouveau sur le bouton ST
- Seite 156 und 157:
3.0 EXPLOITATION 3.1 Manuel d'utili
- Seite 158 und 159:
4.0 MAINTENANCE Afin de garantir le
- Seite 160 und 161:
4.3 Remarques Quel que soit l'état
- Seite 162 und 163:
Symptôme Cause Solution Résultats
- Seite 164 und 165:
Réglage de la tension de la courro
- Seite 166 und 167:
6.0 ANNEXE 6.1 Schéma pneumatique
- Seite 168 und 169:
7.1 Étendue de la garantie produit
- Seite 170 und 171:
8.1 Procès-verbal d'installation e
- Seite 172 und 173:
8.3 Contrôle visuel (personne qual
- Seite 174 und 175:
Contrôle visuel (personne qualifi
- Seite 176 und 177:
Contrôle visuel (personne qualifi
- Seite 178 und 179:
9.0 NOTICES ® Droit d'auteur ATH-H
- Seite 180 und 181:
® Droit d'auteur ATH-Heinl GmbH &
- Seite 182 und 183:
Návod k Obsluze ATH-W W142 sériov
- Seite 184 und 185:
1.0 ÚVOD 1.1 Obecné informace TEN
- Seite 186 und 187:
3 4 1 2 9 8 6 10 7 5 1) ukazatel ne
- Seite 188 und 189:
1.3 Obsluha 1.3.1 Automatický test
- Seite 190 und 191:
1.3.4. Zadávání velikosti pláš
- Seite 192 und 193:
1.3.5 Spuštění procesu vyvažov
- Seite 194 und 195:
Poté se na ukazateli zobrazí NEVY
- Seite 196 und 197:
1.4 Technické údaje maximální h
- Seite 198 und 199:
2.0 INSTALACE Stroj musí v souladu
- Seite 200 und 201:
LED monitor s držákem Nájezdová
- Seite 202 und 203:
Výkres ® Copyright ATH-Heinl GmbH
- Seite 204 und 205:
2.8 Hydraulické připojení Před
- Seite 206 und 207:
Z pouzdra odstraňte upevňovací
- Seite 208 und 209:
2.9.5. Montáž motoru Držák moni
- Seite 210 und 211:
2.9.8. Nastavení způsobu umístě
- Seite 212 und 213:
2.9.10 Servisní kalibrace kalibru
- Seite 214 und 215:
Opět stiskněte tlačítko START n
- Seite 216 und 217:
3.0 PROVOZ 3.1 Provozní pokyn Firm
- Seite 218 und 219:
4.0 ÚDRŽBA Za účelem zajištěn
- Seite 220 und 221:
4.3 Upozornění Na stroji je nezby
- Seite 222 und 223:
Symptomy Příčina Řešení Odli
- Seite 224 und 225:
Nastavení napnutí pohonného řem
- Seite 226 und 227:
6.0 PŘÍLOHA 6.1 Schéma pneumatic
- Seite 228 und 229:
7.1 Rozsah záruky na výrobek •
- Seite 230 und 231:
8.1 Protokol o umístění a před
- Seite 232 und 233:
8.3 Vizuální kontrola (povolanou
- Seite 234 und 235:
Vizuální kontrola (povolanou odbo
- Seite 236 und 237:
Vizuální kontrola (povolanou odbo
- Seite 238 und 239:
9.0 POZNÁMKY ® Copyright ATH-Hein
- Seite 240 und 241:
® Copyright ATH-Heinl GmbH & CO.KG
- Seite 242 und 243:
Manual de Instrucciones ATH-W W142
- Seite 244 und 245:
1.0 INTRODUCCIÓN 1.1 Información
- Seite 246 und 247:
3 4 1 2 9 8 6 10 7 5 1) Indicador d
- Seite 248 und 249:
1.3 Manejo 1.3.1 Autocomprobación
- Seite 250 und 251:
1.3.4. Entrada de los tamaños de n
- Seite 252 und 253:
1.3.5 Iniciar la operación de equi
- Seite 254 und 255:
Después, la pantalla muestra DESEQ
- Seite 256 und 257:
1.4 Datos técnicos Peso máximo de
- Seite 258 und 259:
2.0 INSTALACIÓN La instalación de
- Seite 260 und 261:
Monitor LED con soporte Rampa Medid
- Seite 262 und 263:
Ilustración ® Copyright ATH-Heinl
- Seite 264 und 265:
2.8 Conexión hidráulica Antes de
- Seite 266 und 267:
Retire los tornillos de montaje de
- Seite 268 und 269:
2.9.5. Montaje del monitor Fije el
- Seite 270 und 271:
2.9.8. Ajuste del tipo de aplicaci
- Seite 272 und 273:
Coloque el medidor en la posición
- Seite 274 und 275:
+ Coloque el medidor en la posició
- Seite 276 und 277:
3.0 FUNCIONAMIENTO 3.1 Manual de fu
- Seite 278 und 279:
4.0 MANTENIMIENTO Para garantizar u
- Seite 280 und 281:
4.3 Avisos Independientemente del g
- Seite 282 und 283:
Síntomas Causa Solución Diferente
- Seite 284 und 285:
Ajuste de la tensión de la correa
- Seite 286 und 287:
6.0 ANEXO 6.1 Esquema de conexiones
- Seite 288 und 289:
7.1 Alcance de la garantía del pro
- Seite 290 und 291:
8.1 Protocolo de instalación y tra
- Seite 292 und 293:
8.3 Inspección visual (especialist
- Seite 294 und 295:
Inspección visual (especialista au
- Seite 296 und 297:
Inspección visual (especialista au
- Seite 298 und 299:
9.0 NOTAS ® Copyright ATH-Heinl Gm
- Seite 300 und 301:
® Copyright ATH-Heinl GmbH & CO.KG
- Seite 302 und 303:
Bedieningshandleiding ATH-W W142 Se
- Seite 304 und 305:
1.0 INLEIDING 1.1 Algemene informat
- Seite 306 und 307:
3 4 1 2 9 8 6 10 7 5 1) Weergave on
- Seite 308 und 309:
1.3 Bediening 1.3.1 Zelftest Na het
- Seite 310 und 311:
1.3.4. Invoer van de bandenmaten a)
- Seite 312 und 313:
1.3.5 Balanceerprocedure starten Ba
- Seite 314 und 315:
Daarna wordt in de weergave de ONBA
- Seite 316 und 317:
1.4 Technische gegevens Maximaal ge
- Seite 318 und 319:
2.0 INSTALLEREN De machine mag uits
- Seite 320 und 321:
Led-monitor met houder Oprijhelling
- Seite 322 und 323:
Tekening ® copyright ATH-Heinl Gmb
- Seite 324 und 325:
2.8 Hydraulische aansluiting Voorda
- Seite 326 und 327:
Verwijder de bevestigingsschroeven
- Seite 328 und 329:
2.9.5. Montage van de monitor Beves
- Seite 330 und 331:
2.9.8. Instelling van de methode va
- Seite 332 und 333:
Positioneer de wielsteek op de posi
- Seite 334 und 335:
+ Positioneer de wielsteek op de po
- Seite 336 und 337:
3.0 GEBRUIK 3.1 Gebruikersinstructi
- Seite 338 und 339:
4.0 ONDERHOUD Om de machine veilig
- Seite 340 und 341:
4.3 Aanwijzingen De machine moet, o
- Seite 342 und 343:
Symptomen Oorzaak Oplossing Verschi
- Seite 344 und 345:
Instelling van de spanning van de a
- Seite 346 und 347:
6.0 BIJLAGE 6.1 Pneumatisch schakel
- Seite 348 und 349:
7.1 Omvang van de productgarantie
- Seite 350 und 351:
8.1 Opstellings- en overdrachtsrapp
- Seite 352 und 353:
8.3 Visuele inspectie (door geautor
- Seite 354 und 355:
Visuele inspectie (door geautorisee
- Seite 356 und 357:
Visuele inspectie (door geautorisee
- Seite 358 und 359:
9.0 NOTITIES ® copyright ATH-Heinl
- Seite 360 und 361:
® copyright ATH-Heinl GmbH & Co. K
- Seite 362 und 363:
Instrukcja Obsługi ATH-W W142 nume
- Seite 364 und 365:
1.0 WPROWADZENIE 1.1 Informacje og
- Seite 366 und 367:
3 4 1 2 9 8 6 10 7 5 1) Wskaźnik n
- Seite 368 und 369:
1.3 Obsługa 1.3.1 Test samoczynny
- Seite 370 und 371:
1.3.4. Wprowadzanie rozmiarów opon
- Seite 372 und 373:
1.3.5 Uruchamianie procesu wyważan
- Seite 374 und 375:
Następnie na wskaźniku wyświetla
- Seite 376 und 377:
1.4 Dane techniczne Maksymalny cię
- Seite 378 und 379:
2.0 INSTALACJA Maszyna musi być za
- Seite 380 und 381:
Monitor LED z uchwytem Rampa najazd
- Seite 382 und 383:
Rysunek ® Prawa autorskie ATH-Hein
- Seite 384 und 385:
2.8 Przyłącze hydrauliczne Przed
- Seite 386 und 387:
Wykręcić śruby mocujące z obudo
- Seite 388 und 389:
2.9.5. Montaż monitora Zamocować
- Seite 390 und 391:
2.9.8. Ustawianie sposobu zakładan
- Seite 392 und 393:
Ustawić sprawdzian mierniczy w poz
- Seite 394 und 395:
+ Ustawić sprawdzian mierniczy w p
- Seite 396 und 397:
3.0 PRACA 3.1 Instrukcja eksploatac
- Seite 398 und 399:
4.0 KONSERWACJA Aby zapewnić bezpi
- Seite 400 und 401:
4.3 Wskazówki Bez względu na zani
- Seite 402 und 403:
Oznaki Przyczyna Rozwiązanie Róż
- Seite 404 und 405:
Regulacja naprężenia paska napęd
- Seite 406 und 407:
6.0 ZAŁĄCZNIK 6.1 Schemat obwodu
- Seite 408 und 409:
7.1 Zakres gwarancji produktu • P
- Seite 410 und 411:
8.1 Protokół ustawiania i przekaz
- Seite 412 und 413:
8.3 Kontrola wzrokowa (upoważniona
- Seite 414 und 415:
Kontrola wzrokowa (upoważniona oso
- Seite 416 und 417:
Kontrola wzrokowa (upoważniona oso
- Seite 418 und 419:
9.0 NOTATKI ® Prawa autorskie ATH-
- Seite 420 und 421:
® Prawa autorskie ATH-Heinl GmbH &
- Seite 422 und 423:
Návod na Obsluhu ATH-W W142 sério
- Seite 424 und 425:
1.0 ÚVOD 1.1 Všeobecné informác
- Seite 426 und 427:
3 4 1 2 9 8 6 10 7 5 1) Indikátor
- Seite 428 und 429:
1.3 Obsluha 1.3.1 Samotestovanie Po
- Seite 430 und 431:
1.3.4. Zadávanie veľkostí pneuma
- Seite 432 und 433:
1.3.5 Spustenie procesu vyvažovani
- Seite 434 und 435:
Potom sa na indikátore zobrazí VN
- Seite 436 und 437:
1.4 Technické údaje Maximálna hm
- Seite 438 und 439:
2.0 INŠTALÁCIA Stroj musí v súl
- Seite 440 und 441:
LED monitor s držiakom Nájazdová
- Seite 442 und 443:
Výkres ® Copyright ATH-Heinl GmbH
- Seite 444 und 445:
2.8 Hydraulické pripojenie Pred uv
- Seite 446 und 447:
Odstráňte upevňovacie skrutky z
- Seite 448 und 449:
2.9.5. Montáž monitora Upevnite d
- Seite 450 und 451:
2.9.8. Nastavenie metódy pripevňo
- Seite 452 und 453:
Polohujte meraciu šablónu do polo
- Seite 454 und 455:
2.9.12. Servisná kalibrácia merac
- Seite 456 und 457:
3.0 PREVÁDZKA 3.1 Prevádzkový po
- Seite 458 und 459:
4.0 ÚDRŽBA Na účely zaistenia b
- Seite 460 und 461:
4.3 Upozornenia Na stroji je nutné
- Seite 462 und 463:
Symptómy Príčina Riešenie Odli
- Seite 464 und 465:
Nastavenie napnutia hnacieho remeň
- Seite 466 und 467:
6.0 PRÍLOHA 6.1 Schéma pneumatick
- Seite 468 und 469:
7.1 Rozsah záruky na výrobok •
- Seite 470 und 471:
8.1 Protokol o umiestnení a odovzd
- Seite 472 und 473:
8.3 Zraková kontrola (povolanou od
- Seite 474 und 475:
Zraková kontrola (povolanou odborn
- Seite 476 und 477:
Zraková kontrola (povolanou odborn
- Seite 478 und 479:
9.0 POZNÁMKY ® Copyright ATH-Hein
- Seite 480 und 481:
® Copyright ATH-Heinl GmbH & CO.KG


LinkedIn
Facebook
Instagram
Youtube
Email
Twitter
Pinterest